Turnigy Talon V2
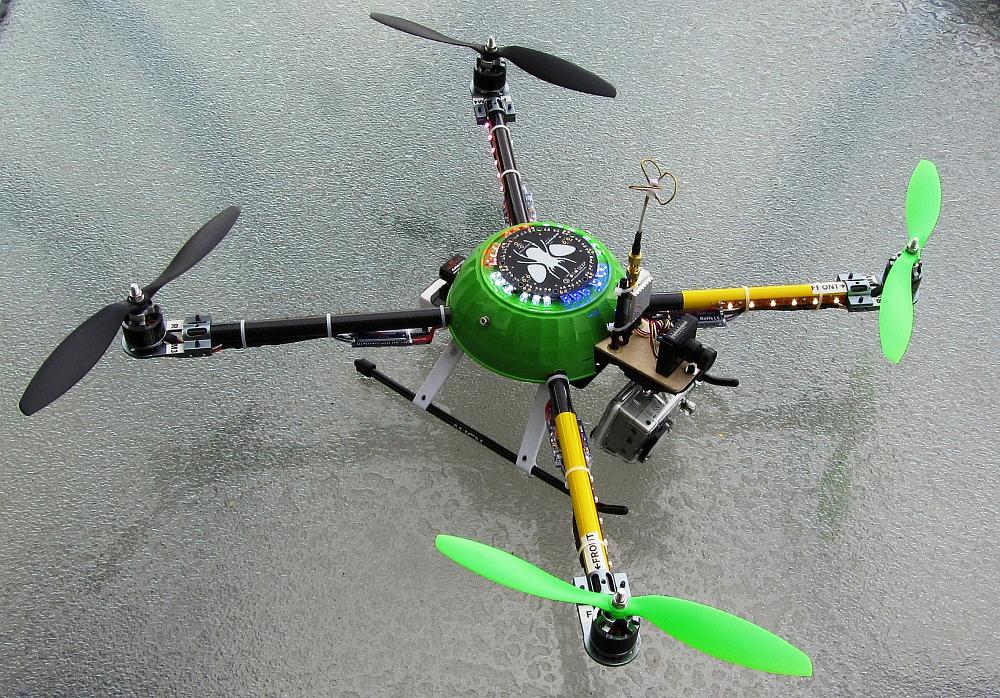
|
| Fully equipped and waiting for reliable flight control |
Contents
Talon V2 Build Log
This little project came about because I have always wanted a stable flying camera platform and after seeing D-man fly his and Captain Awesome's incredible video work I just had to give it a shot. I decided on the HK Talon V2 because it was an inexpensive frame and there was good forum information available. I decided to do a ground up build, rather than a RTF unit because I think that is the best way to learn and understand when things go wrong (and they do!). So, with that said, here are a few notes on how I set mine up.
General Specifications
Build Date - June 2012
| Airframe Type - | Multi-rotor Quad-X | Flying Type - | Sport Photography | |
| Motor Centers = | 550mm / 21.6" | Propellor Span = | 30.6" | |
| Rotor Area = | 254 sq. inches | Weight wo/w Cameras = | 39.6oz / 50.6oz | |
| Motor - | NTM 28-26 1000Kv | Rotor Load = | 22.4 oz/sq. ft. | |
| Propellor - | 9 x 4.7 Gemfan | Power = | 1000 watts | |
| Thrust = | 128 ounces | Thrust/Weight = | 3.03 / 2.53 | |
| Battery Type - | Lipoly 3s1p | Capacity = | 2700mah, 35C | |
| Speed Control - | Turnigy Blue Series 30A | BEC - | Internal 4.8v |
Component List
The component list includes all the major components needed. What is not shown are additional fasteners tie-wraps, connectors, aluminum materials, etc. Also not shown is the radio reciever. The quantities shown are for a single build and do not reflect spares such as extra props or battery packs.
| Item (as of June 22, 2012) | Price | Quant | Sub-Tot |
| Turnigy Talon Quadcopter (V2.0) | $49.95 | x1 | $49.95 |
| NTM Prop Drive 28-26 1000KV/315W | $15.99 | x4 | $63.96 |
| NTM Prop Drive 28 Series Accessory Pack | $1.89 | x4 | $7.56 |
| HobbyKing 30A BlueSeries ESC | $10.47 | x4 | $41.88 |
| HobbyKing Quadcopter Power Distribution Board | $3.79 | x1 | $3.79 |
| ZIPPY Compact 2700mAh 3S 35C Lipo Pack | $18.80 | x1 | $18.80 |
| Woven Carbon Fiber Sheet 300x100 (1.5MM Thick) | $13.51 | x1 | $13.51 |
| Quadrino Zoom V2 Flight Controller | $149.95 | x1 | $149.95 |
| GemFan 9x4.7 Normal & Reverse Rotation | $1.75 | x4 | $7.00 |
| Landing Skid (Gear) | $9.95 | x1 | $9.95 |
| Total- | $366.35 |
Flight Control (FC) Board
I started with the HobbyKing KK board as I wanted this to be a good learning experience. It was! I first mounted this board with removable servo tape and Dubro white vibration foam but then learned this was too soft for the Gyro's. I swapped out the white foam for some much more firm black foam (as found on the HK power board) and this worked much better..
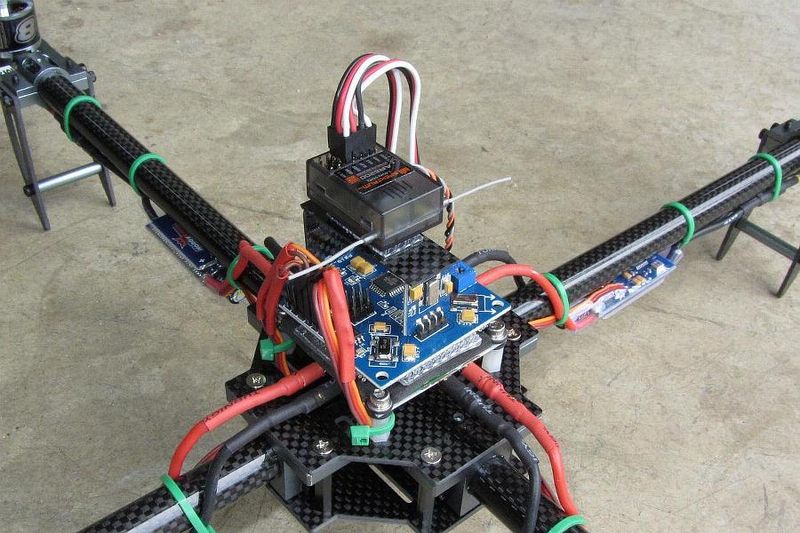
|
| The KK board with added CF bracing and the RX on top |
After a lot of online research and playing with firmware and settings I got it to fly although it was a bit of a handful. With this FC board I could not get to that confidence point where I would feel comfortable putting a camera on this rig. I have to say though, for $19, it's a good deal..
Next up (and current) I bought the Quadrino MultiWii board by flyingeinstien.com. I purchased this from RC Dude in Portland for $145. At first I mounted this board with the same servo tape and black foam as the KK board but then on the re-config (see power train section) I changed this to simple nylon stand-offs and this works just fine..
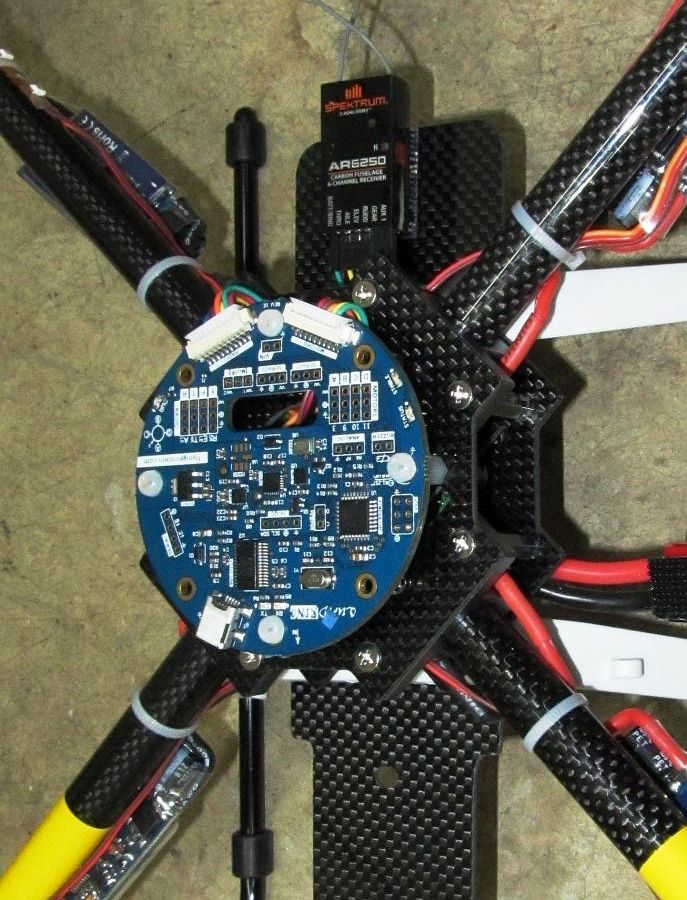
|
| The FlyingEinstien Quadrino Flight Controller board |
I was first going to spend the extra bucks and get the Naza System ($230) but no one had it in stock and the Quadrino had some great user press. I will say that it was a challenge in some respects as there is no comprehensive "How-to" and you have to find the information needed to understand this set up by doing a lot of online re-search and even more trial and error work..
At the end of the day when the bord works, it is rock solid, very stable, has some usable extra features and I think could be a good value..
Quadrino Set-Up
Board Version - 1E
Set-up is an area that has tested my resolve! The information "out there" is huge but it is also confusing and has been a constant source of some frustration. With that said, here is how I went through the set up after some trial and error.
There was an ongoing intermittent failure (see Issues) where, while in flight and without any input from the TX, the Quad would just start violently flipping and crash. in every case, when I walk up to the unit, the "Arm" light is on and the ESC's are beeping meaning they have lost contact with the board. Additionaly, the RX has a solid light which means it did not loose signal from the TX.
Components
First I made sure there was some record of success with the components I have chosen and the Quadrino board. This is really important because a hardware conflict or mis-match can be devastating. That is, the smoke can get out.
Mechanicals
On the frame set-up it is important that everything is tight and remains so. I use blue Loctite on all fasteners and this works well. On the motors I check the balance and adjust with tape if needed. Props are balanced and I do not use the large aluminum prop nuts that come with the motors as they are always out of balance (in my exp). I use standard hex nuts and SAE style flat washers. So, everthing is tight and balanced.
Wiring
At this point I have wired the board differently several times to try and find the possible source of the flipping issue. Because the issue was intermittent, I would normally suspect a loose connection but now after several variations, I realize it is not the connections. The picture shows the basic diagram:

|
| Basic motor and receiver wiring |
There are other ways to set up power as the Quadrino board has a 12v input (Vin) with an internal 5v regulator. I chose instead to use the Motor A ESC's BEC as power for both the board and the RX.
The different wiring methods I tried were the elimination of the "EZ" connectors by wiring directly to the board and eliminating just the motor "EZ" connector. The results were no different. I made these changes as I suspected there were loose or intermittent connection issues with these bits.
Software
When I received the board it had very basic programming so I went to the FlyingEinstein site and downloaded the lates package, 2.0. I installed to upload program and the user interface (GUI) and re-flashed the basic program. I did not make any changes to the program, I did confirm it had the correct parameters built in for board type, etc.
Next I opened the GUI and set up switches for Auto Level, MAG and BARO. I then went through the calibration for Mag (Compass) and ACC (Accelerometer). I did not make any changes to the "PID" parameters.
Since that initial set-up I have re-flashed the board 4 times with the same settings. This includes a re-download of the software. I have changed one PID setting adding a little to Yaw rate but this is the only change.
Quadrino Issues
The big one was an intermittent issue with this board where it just flips over and over and crashes. This occured multiple times and the conditions when it happened and what I found on inspection were almost always identical.
| Pre-Flip | Post-Flip |
| Normal level Flight | Motor squeal |
| No MAG | ESC's lost signal beep |
| No Baro | RX shows no TX signal loss |
| No Auto Level | Board shows armed |
| Hovering | TX is not recognized |
For remedies, I tried many including multiple re-wiring as I have alredy written. Here are some of the other attempts:
| Change | Effect |
| Re-wire | No Change |
| Re-calibrate ESC's (4x) | No Change |
| Re-flash board (4x) | No Change |
| Soldered motor wires | No Change |
| Board re-mount | More Stable |
| Balanced Mtr and Props | Smoother |
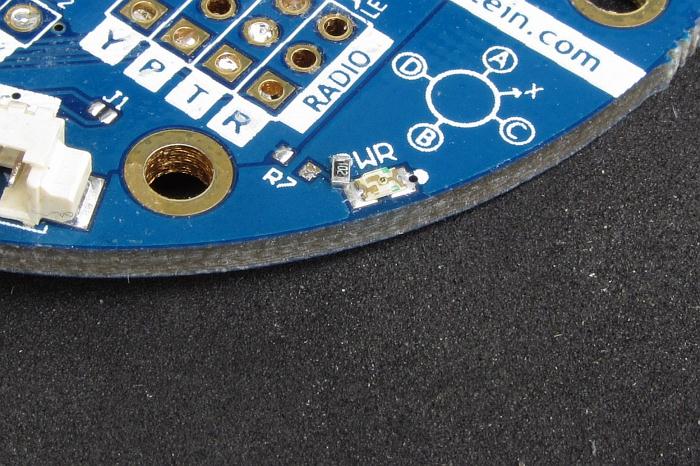
A picture is worth a thousand words
On one recent inspection, after working so much to resolve the flipping issue, I found a misplaced component:
|
| Resister R7 is, not right |
I have contacted the manufacturer and they immediately authorized a replacement board; incredible customer service! I will update after this new board is fitted.
Boot Up Issue
On several occasions the board would not boot when the battery was plugged in. The board was getting power which was evident by the fact the RX was on and lit up. In nearly every case, if I simply plugged in the USB cable and powered the board from my laptop accessed the GUI and then shut it all down, it would then boot up fine with the battery.
Strange Shut Down Issue
After the last re-wire, I got it all back together and set it on the garage floor for a test. I plugged in the battery, everything booted just fine. I calibrated ACC and Gyro with the sticks and got the desired flashes. I armed the board and throttled up. The motors started up fine and I slowly accelerated when they just slowed to a stop. The board sat there with the arm light on and the ESC's began the lost signal beep. The TX had no effect so I disconnected the battery. I then spent 30 minutes trying to get it to work in the GUI. It would boot, the GUI would start streaming data and then it would freeze. I tried many things and then, magically, it started working again.
Plus - Delta
| Plus | Minus |
| Stability | "EZ_Connect" Wiring |
| Features | Online support |
| Tune-ability | Mount holes |
| Size | |
| Durability |
On the minus side
I don't really like the EZ-connect set up. While it does lower the profile of the board, having to deal with re-wiring on the motor side is a pain and I believe adds to potential failure modes. It would have been nicer if they had left the pin headers on the motor side.
I say online support is a minus because of the amount of research I had to do to get all the information to be successful and to understand the system. A single, comprhensive site would be better. I understand this is one of the caveats to open source development so maybe I'm just whining.
On the mount holes it would be nicer if they were radial slots of about 8mm to accomodate mount variations. I had no trouble filing these to fit, I just don't like filing on a PCB.
Power Train
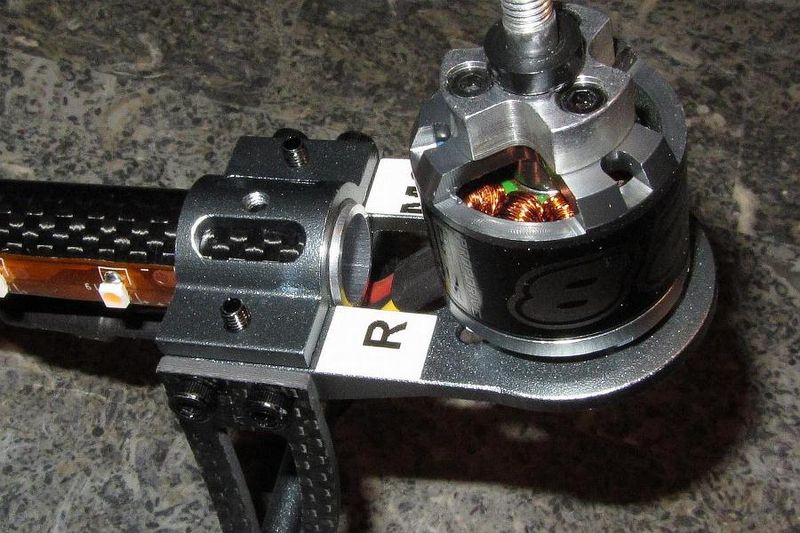
For the power train components I chose parts that were consistently used by others on this frame. It is a bit overpowered and a little heavy for what I am trying to do and this does shorten flight times but it works and it is very smooth..
|
| The Turnigy NTM 28-26 1000Kv motor |
On the prop selection, I started with APCsf 10x3.8 and these worked well but they did nothing visually for helping with seeing orientation. I then changed to GemFan 10x4.5 in black and orange. These also worked well however when I changed to the Quadrino board there was a quite a bit of wobble when trying to hover motionless. After reading A LOT I found a post suggesting a smaller prop and so I tried the GemFan 9x4.5 and the wobbles disappeared!.
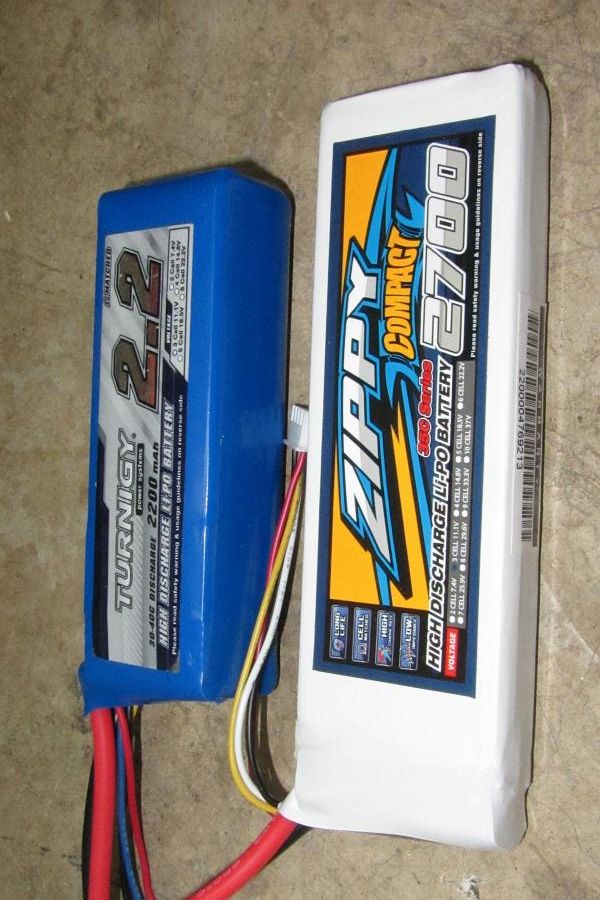
On the batteries, I already had a pile of 2200mah-3S 20C, 30C and 45C packs so that is what I am currently using. All of these packs deliver a solid 7 minutes flight time and I can get 9+ if just gently hovering. I am also trying a new Turnigy 2700 "Compact" pack to see how much they change the flight time (I already have a 4400 to try at some point). The "compact" packs are nice because they are very thin so they are easy to fit. Additionally, these new packs are light, weighing 218gr (7.7oz). For comparison, the 2200 pack shown weighs 199gr (7.0oz).
|
| The new "Compact" Zippy Lipo |
|
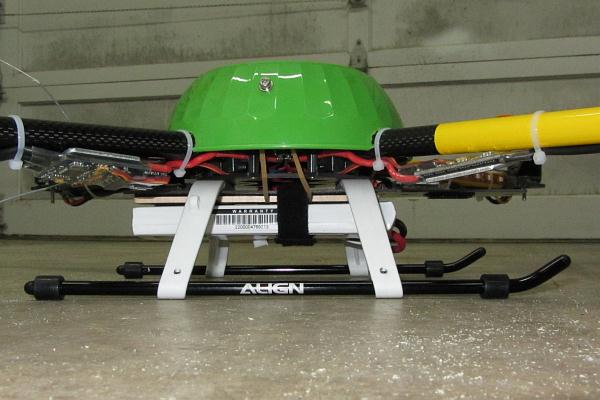
| The side profile tells the story |
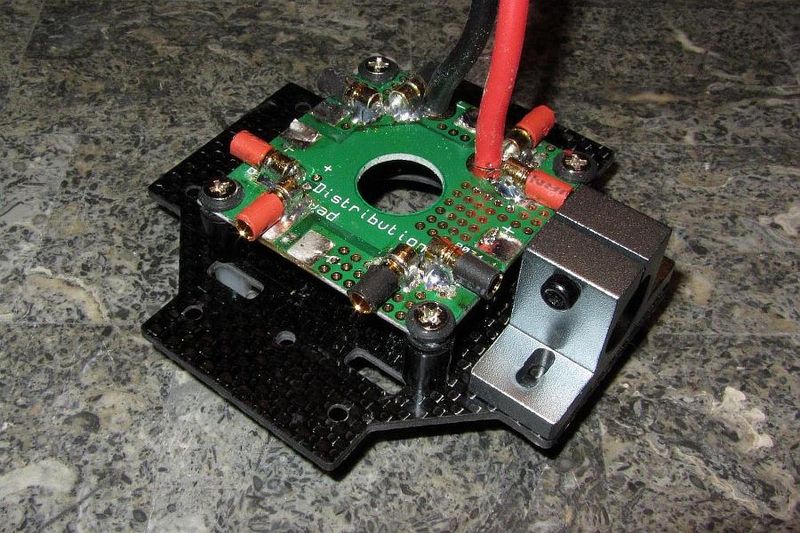
On the power board, I first mounted it on top of the top center plate and added wire extensions to the ESC's. This worked OK but it wasn't a clean way to do the wiring and it made the FC board pretty tall. (See KK board picture above).
While working through the set-up and some initial "glitches" with the Quadrino board I disassembled and re-configured the power board so I could mount it between the top and bottom plates. This helped clean up the wiring and lowered the height (a lot!) of the FC board..
|
| The HK power board with re-arranged components and mounted to the bottom of the top plate |
Power Train Component List
- Motors - HobbyKing NTM 28-26, 1000Kv
- ESC's - HobbyKing 30A Blue Series
- Props - RCDude GemFan 9x4.5
- Battery - HobbyKing Compact 2700mah 3S, 35C
- Power Board - HobbyKing Power Distribution Board
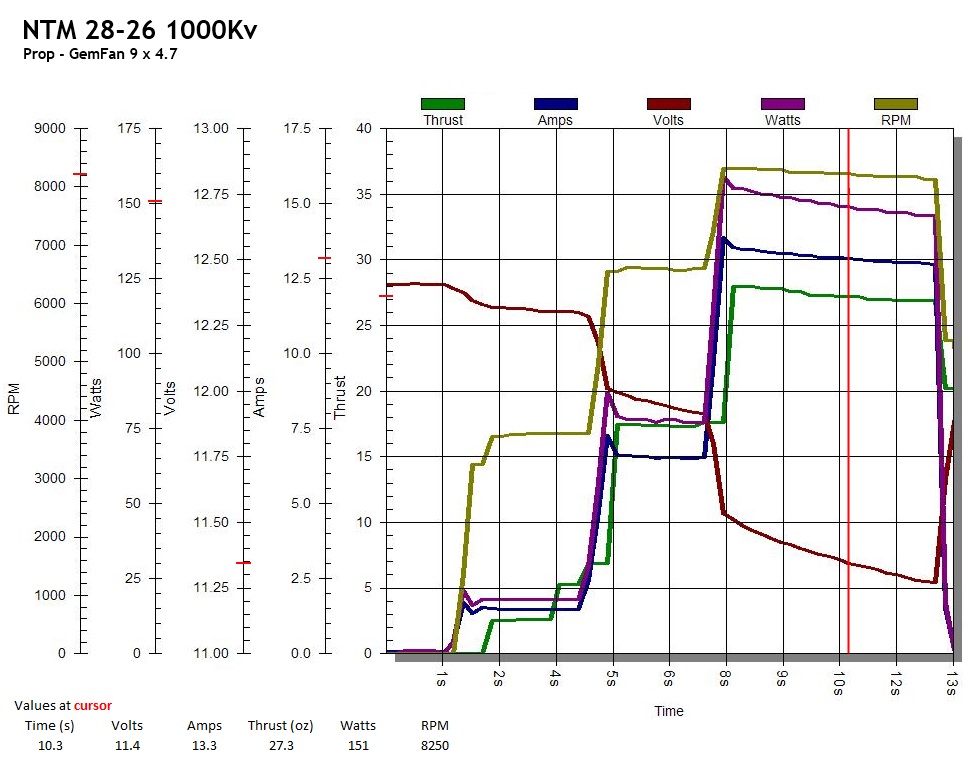
|
| Motor Test (single unit) |
It is easy to see by the motor test I went way overboard on the ESC size. An 18A would work just fine!
Frame Changes and Add-Ons
The frame changes I have made so far address durability and usefulness in terms of a camera platform..
Tube Bushings
Since the main tubes are essentially clamped at each end, I felt they all needed additional strength to keep from loosening and slipping. The tubes are extremely nice carbon fiber with an OD of 14mm and an ID of ~12mm. To make the bushings, I bought a short length of aluminum tube which was 1/2"OD x 27/64"ID and I turned the OD down to .472" (12.01mm)OD with a length of .657" (16.7mm)..
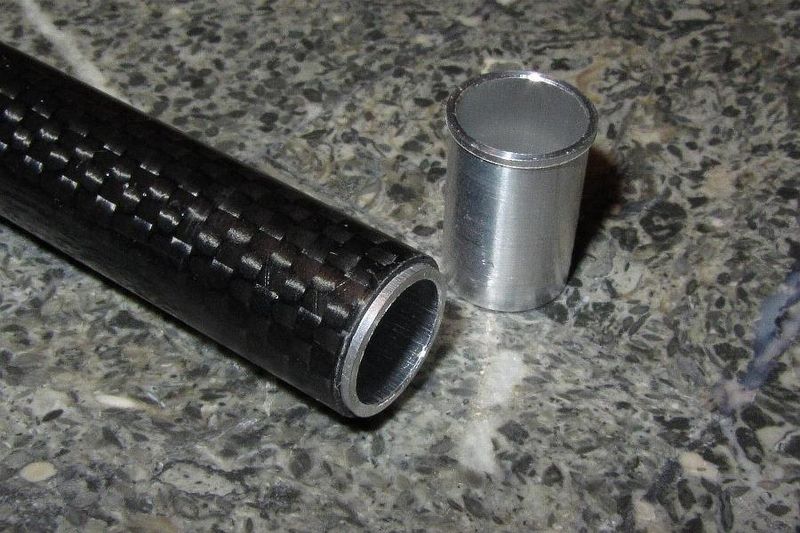
|
| Machined aluminum bushing for all tube ends |
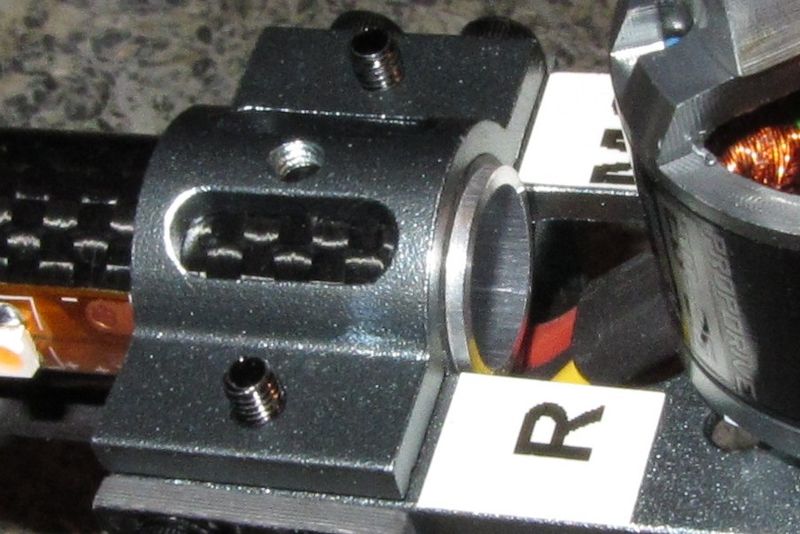
|
| The tube mounted in the motor mount |
At this diameter it was fairly easy to push the bushing into the tube end and only two required “tapping”. Theoretically this should significantly strengthen the clamped joints. (And, it looks cool!).
Landing Gear
Since I was eventually going to go with a camera mount of some kind I knew the stock "pointy fork" landing gear would be going away. I looked online but found nothing in terms of a simple, adaptable set-up that was a reasonable price. Then I found, quite by accident, the Trex500 landing skid set for $10 at the local hobby shop (RCHobbies of Covington, WA)! These are really easy to adapt to the Talon frame by just drilling four holes and replacing the four screws with longer ones. In my case I took it one step further by turning some custom aluminum bushings so the bolt-up would be more secure and not loosen up. .
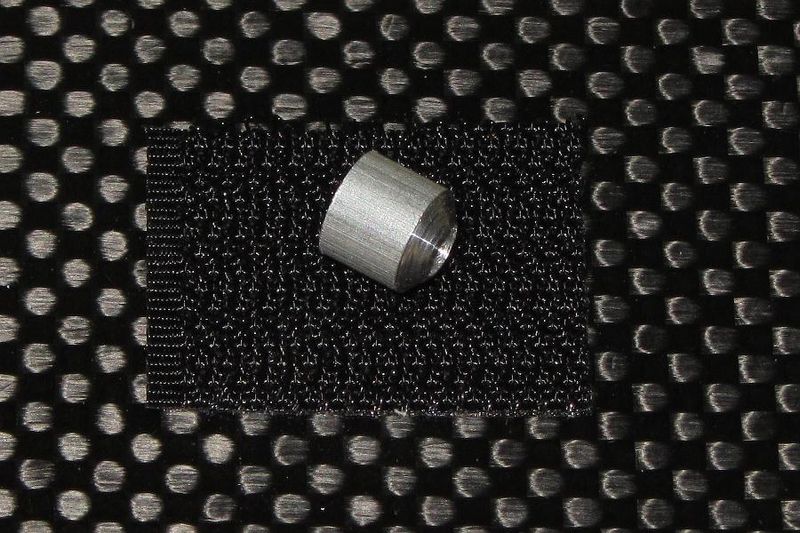
|
| Landing Gear mount bushing made from 1/4" aluminum bar stock |
Key learning - Landing skids bounce and the stock pointy things don't. This is probably due to the fact the Trex500 set-up is made from relatively lightweight, flexible plastic. This could be resolved I suspect by adding cross bracing or just don't land hard on concrete..
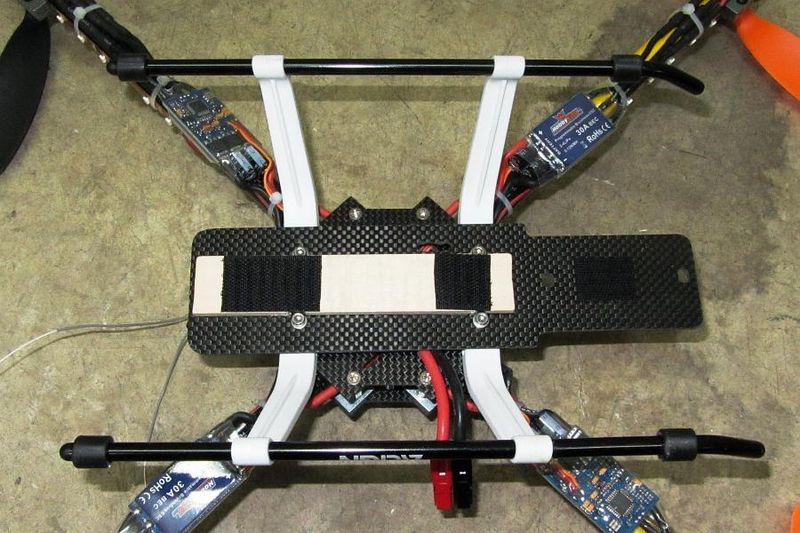
|
| Bottom view of landing gear and 1.5mm CF battery tray |
Note - This landing skid set is not very tall which is good from a stability standpoint but challenging if you need to bottom mount a lot of gear..
Camera and Battery Mount
I tried a couple of different camera mount ideas and they all left things too vulnerable. I also wanted to mount up a vtx (FPV) system to stream live video (not to fly FPV). So I needed a platform that would do both and hopefully be interchangeable. This is what I came up with:.
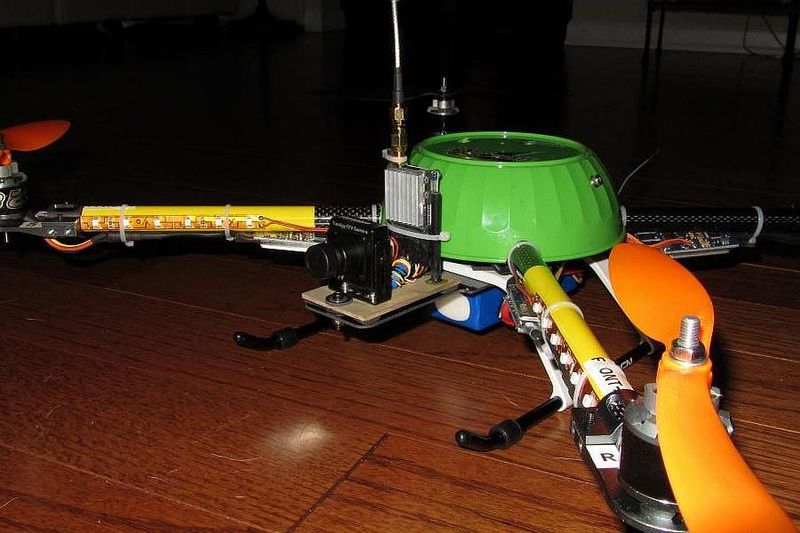
|
| Video Camera and Video Transmitter Mounted on new board |
The board which also serves as a battery tray is cut from a piece of 1.5mm carbon fiber sheet ($13.51 from HK) and uses the same 4 mounting holes as the gear. I have set up the video cam and vtx on a piece of plywood and added rubber isolators to help with vibration. This bolts on the plate with two 3mm socket head screws and will be easy to swap out for a true camera like a GoPro (soon!).
Cereal Bowl Special
To protect the FC board with something fairly strong, I looked around and found a cheap $.99 cereal bowl at the local super-store. I carved out relief for the main tubes and made some clips inside so I could hold it on with a couple of rubber bands. In the air it looks great and I think I will add internal LED's to it for that space ship look. Yes it is a little heavy but it will stop any damage to the FC board..
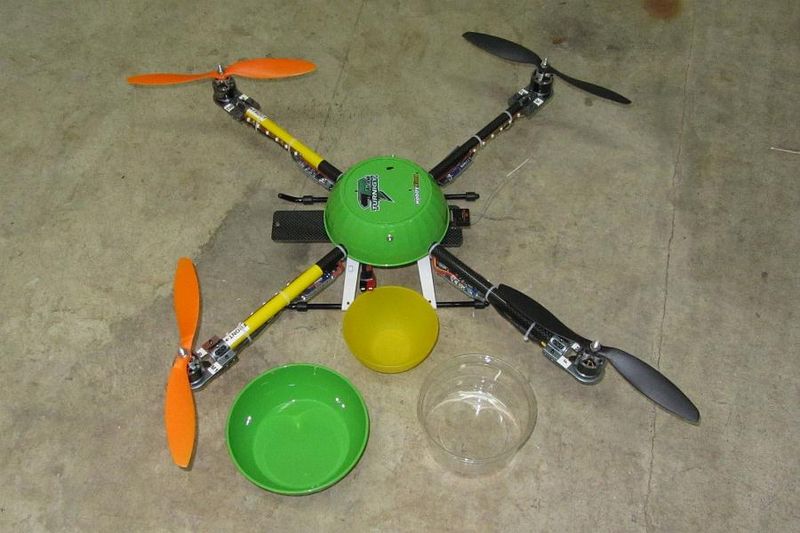
|
| The 99 cent Cereal Bowl Special and some other options |
Flying
OK, I have left out the real work in this write up which was all the research and fiddling I had to do to get everything to work. There are a boat-load of variables to deal with in the Quadrino, MultiWii system so have patience, do research and above all else, when chasing down a problem try one thing (and only one thing) at a time..
It fly’s great! It is extremely zippy and climbs straight up with real authority. This is likely because the entire craft weighs 41oz (with video cam and vtx) and one motor will pump out 30oz of thrust. This means the thrust to weight ratio is a lovely 2.92!.
With the Quadrino board you get Altitude hold which uses barometric pressure, Heading lock which is done with a magnetic compass sensor and Auto Level which is designed to snap you out of trouble. How well do they work?.
Altitude Hold
This function works as good as one could expect given there is no GPS (apparently coming soon). On mine it works best above 8 feet and you have to throttle up a bit just once. It does drift up and down, plus or minus ~2 feet but it does so very smoothly.
Heading Lock
Heading lock works OK as well. It does drift a little especially if you fly near buildings (my exp). Note - This function is tricky to get calibrated correctly and so causes many cases of erratic behavior. Read a lot and then test without props a LOT before turning this function on.
Auto Level
Auto level works great for its intended purpose. That is, it will re-level an out of control ship. Once everything is working well with the stock settings, this function will likely need some parameter tuning. Mine, which I believe is typical on stock settings, would over-correct a little when I turn it on so it takes a little time to settle down after throwing the switch. The over-correction can be worse in breezy conditions. The key learning here for me was "let it settle down". I have tuned it some and it has improved but I rarely use it as it is simply not needed.
Further Developments
EZ-Connect
One issue I have mentioned is the EZ-Connect system of wiring I don't feel is all that great. Recently I had a situation where while flying beautifuly, with no TX inputs, the Quad just started flipping violently to the point it threw the battery and crashed. The damage was not bad, just a bent motor mount and a broken prop. On inspection, I found the EZ connector for the RX was disconnected. While this could have happened during the impact, I have decided to take this out of the equation and solder pigtails for all inputs and outputs directly to the board.
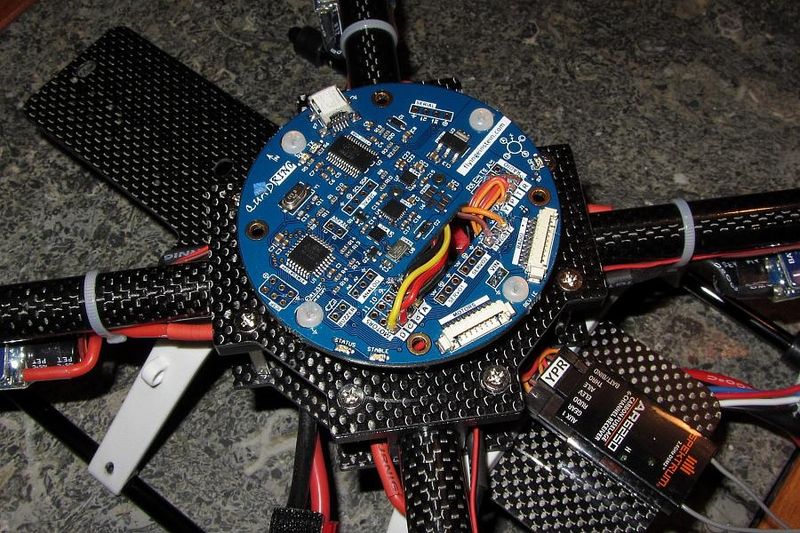
|
| Quadrino with inputs and outputs hard wired |
Stand-Off - ish
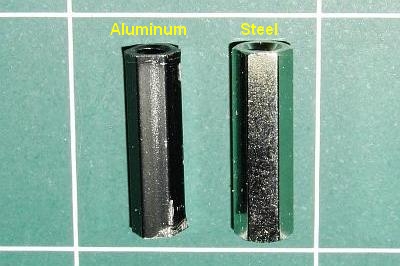
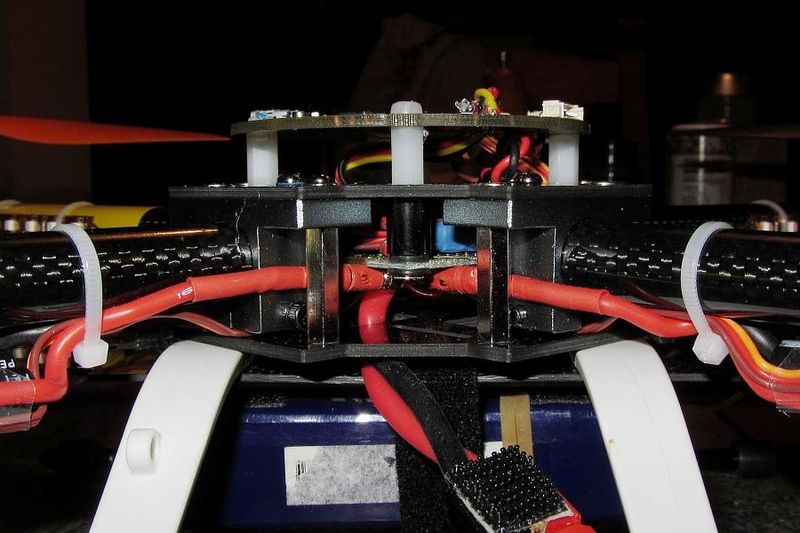
Another development has been to change the aluminum stand-offs to steel. This decision is a result of constantly having to tighten the top and bottom plate screws after every third or fourth flight (yes< they were all locktited repeatedly). I found the steel stand-offs at my local Radio Shack store and they are about 1mm longer but otherwise the same with the same 3mm threaded bore. The extra millimeter also provided a little more room between the plates.
|
| Stand-off deformation after contiuous re-tightening |
|
| New steel "Radio Shack" stand-offs |
Stay tuned!...markqv
Parting Shots
|
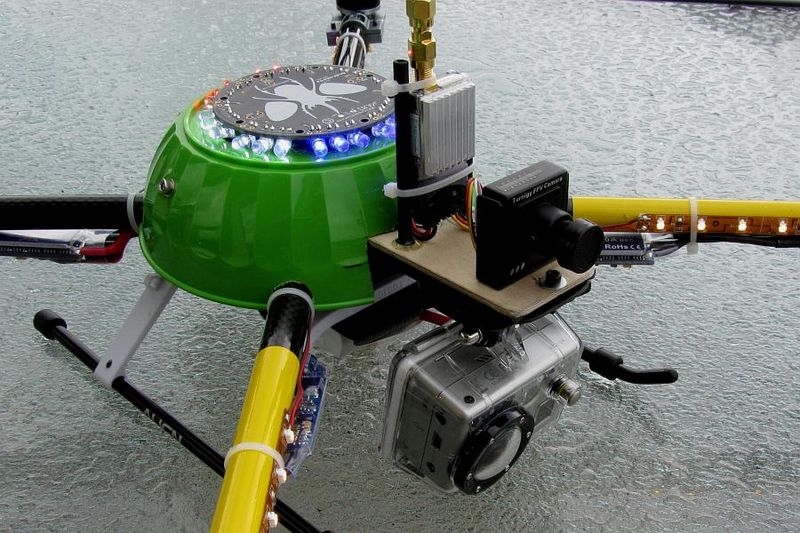
| Close-up of "the gear" |
|
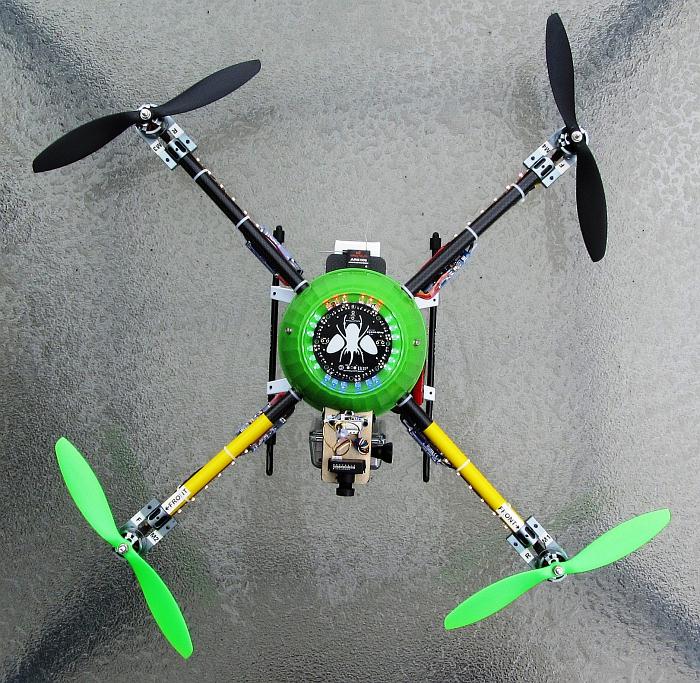
| Top down look! |
|
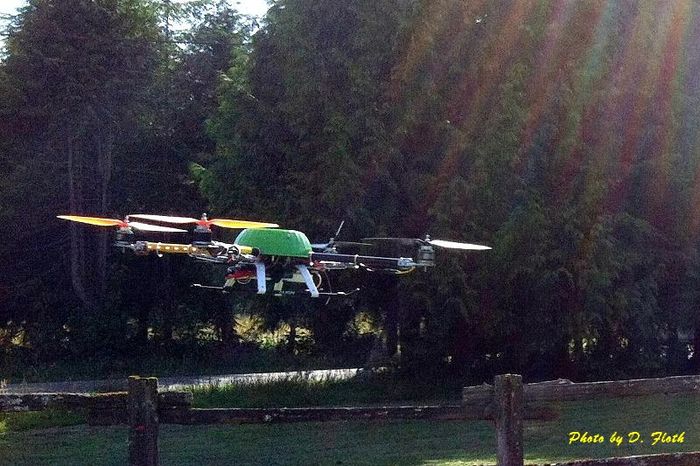
| No strings attached! |
|
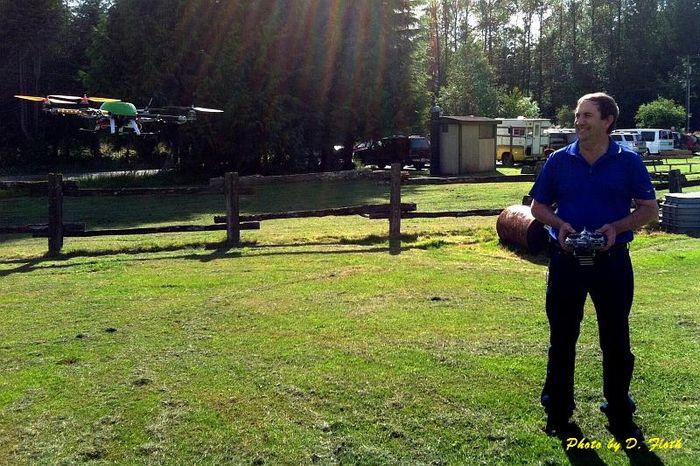
| OK, this could be fun! |
See Also
| RC Groups | Flying Einstein |
| MultiWii | |
| RC Dude! | |
| HobbyKing |