Team Black Sheep - TBS Discovery
![]()
October 2012

|
| First Build |

|
| Current Build |
Contents
Team Blacksheep TBS Discovery Build Log
After my experience with the HT-FPV frame, I stepped it up a bit.
General Specifications
Build Date - October 2012
Current Weight fully loaded with current mods as of Aug 2014 - 61.2oz (1735gr)
| Airframe Type - | Multi-rotor Quad-X spyder | Flying Type - | FPV Photography | |
| Motor Centers - | 510mm / 21.6" | Propellor Span - | 28.5" | |
| Rotor Area - | 254 sq. inches | Weight - | 50.2oz | |
| Motor - | AX2810Q 750Kv X4 | Rotor Load - | 27.4 oz/sq. ft. | |
| Propellor - | 10 x 3.8 DJI | Power - | 1000 watts MAX | |
| Thrust - | 128 ounces MAX | Thrust/Weight - | 2.55 | |
| Battery Type - | Lipoly 4s1p | Capacity - | 4000mah, 25C | |
| Speed Control - | SimonK 25A X4 | BEC - | N/A |
Component List
The component list includes all the major components needed. What is not shown are additional fasteners tie-wraps, connectors, aluminum materials, etc. The quantities shown are for a single build and do not reflect spares such as extra props or battery packs. Additionally the RX and any camera Gimbals are not shown in this list.
| Item (Updated June 23, 2013) | Price | Quant | Sub-Tot |
| TBS Discovery Frame Kit with TBS Core installed | $179.85 | x1 | $179.85 |
| AX2810Q 750Kv Motors** | $29.56** | x4 | $118.24 |
| Graupner 10x5 Normal & Reverse Rotation | $11.29 | x4 | $45.16 |
| SimonK 25A Flashed ESC by Steve (saabguyspg) | $22.00 | x4 | $88.00 |
| Nanotech 3700mAh 4S 25C Lipo Pack | $27.66 | x1 | $27.66 |
| DJI Naza Flight Controller | $230.00 | x1 | $230.00 |
| DJI Naza GPS add-on | $169.95 | x1 | $169.95 |
| 400mW 1300MHz Video Transmitter | $49.99 | x1 | $49.99 |
| 1.3Ghz Cloverleaf Antenna | $29.99 | x1 | $29.99 |
| Low Pass Filter for 1.3Ghz Antenna | $26.99 | x1 | $26.99 |
| 600TVL Sony SuperHAD Board Camera | $99.95 | x1 | $45.99 |
| Total- | $1011.82 |
**Motors are $17.56 plus $12ea for abec3 bearings.
You'll also need a base station and to see mine, go to this link:
FPV Base Station
What is here

|
| The TBS Discovery Kit |
These build notes are brief and only cover some of the things I found important or a good practice. The HT-FPV build got all the set-ups defined and understood and proved to some degree, the compatability and reliability of the chosen components.
As in the HT-FPV build,I do not describe in these notes the basic frame assembly as the frame maker has a very good, easy to understand manual which covers everything needed. These notes then describe how I put together some the components I selected in this frame.
Motors, ESC's and Power Distribution
Like on my other quad I chose parts that were consistently used by others with reliable results. With the new SimonK ESC's it works well and it is very smooth. The original motors were HK NTM28-26 1000Kv units. They perform very well once balanced but the Kv was a little higher than I wanted. Since I recently added a Brushless Gimbal the weight has gone up considerably so I have changed the motors to the HK AX2810Q, 750Kv units.

|
| Motor Comparison |
The difference is remarkable. This new motor is unlike any other HK motor I have seen. The quality is way up with extra large bearings and a nice prop adapter feature where the motor shaft is threaded (4mm) and the bell has a step for the prop to sit on. On balance check, almost none was needed. In flight they are smooth and never come down warm. I have purchased a set of abec3 replacement bearings from RCbearings.com in the event they start "noising up" or if vibration starts to creep in. As is they are smooth so for now I have simply lubricated them with Scorpion lube.

|
| Bearing Comparison |
On with the build
The first part of the build was to assemble the motors and ESC's on the DJI arms. I kept the 3.5mm bullet conectors between the ESC's and the motors for now but i will likely solder these up after the first couple of flights.

|
| Arms complete with motors and ESC's |
Wire it Up!
Since I bought the frame with the installed TBS Core, I am not adding in the EzOsd system I used on the HT-FPV. This simplifies the wiring a great deal. The only thing I had to do is enable the 12 volt circuits for the FPV camera and the Vtx as well as enabling the Core Osd.
I mounted the Naza FC with servo tape and put together a wire harness using clip type servo connectors so I can easily access each ESC without changing any wiring. On the other end of this harness I added a 4 pin servo connector for the 4 Naza outputs and a single pin connector for a ground. I then mounted the servo connectors to the board with servo tape.

|
| Wire Harness for ESC's with clip type servo (ESC) connectors |

|
| Naza and Servo Connectors |

|
| This is a quick build! |
Lastly I hooked up the vtx and the camera to their respective solder pads. I could have built two plug in harnesses but I like the reliability of the soldered connections.

|
| Camera and Transmiter ready. |
Finished
The last few things to do was to drill the top plate for the GPS post, plug in the RX connectors and screw on the top plate. Add props, a few tie wraps, charge the battery and...wait for good weather!

|
| Fly time! |
How She Flys
There are two big parts of any multi-rotor that determine how and how well they fly. First the flight controller which can be very inexpensive with a minimal amount of features to moderate expense like the Naza M on this airframe to Very expensive like the DJI Wookong system. The second big part is the frame, how big and how it is layed out and how stiff and heavy the frame elements are.
Naza M
I continue to be impressed with this FC. For me it has been rock solid with enough functionality for everything I need. It is easy to set up with very little tuning needed and no PID tuning at all. DJI has made this one pretty much plug and play. It makes flying extremely easy, handles wind much better than I can and the GPS position lock is just spooky it works so well. Typically it will hold the quad inside a one meter box whether there is wind or not. For doing aerial photography, it's a dream!
The TBS Discovery Frame
This frame is solid and from a layout standpoint it is second to none. Flying it does take a little getting used to as it is asymmetrical which causes some strange flight behaviors but nothing really bad, just different. One example of this is its tendency to fight spinning on it CG axis (piroetting). It will also slide a bit in a bank turn but again, not a big problem.
Updates
- Swapped out the 1.5watt VTx for a 400mw VTx. This saves power, a little weight and doesn't swamp the GPS.
- Swapped out the $99.95 HK video camera for a SC2000 Sony SuperHAD for $45.99. It's much better (and less $$).
- Swapped out the JR9503/Spektrum Radio gear for a Turnigy TH9x with ER9x Firmware, a FrSky module and FrSky V8FRII RX. It's much more programmable, gives me adjustable gains in flight and should have better range.
 
|
| Current set-up which works like a dream! |
Updates and Add On's
Being a rainy season I have continued to play around with new ideas :)
- Added an RCTimer brushless Gimbal with a Martinez V1 control board
- Removed the FrSky RX and went back to the Spektrum AR8000 with my JR 9503 TX
- Shortened the GPS mount to protect it from a flip
- Changed from the Graupner 9x5 eProp to GemFan Wood, 10x4 to help with the increase in all up weight
- Changed back to the Graupners as the GemFans have tracking issues I couldn't solve
- Added an old Align skid landing gear to get it off the grass a bit
- Removed the Align Skid Landing Gear and changed to simple CF stick extensions
- New all up weight - 62.8oz (1780gr), an increase of 10.6oz (300gr)
- Swapped the NTM2826 motors for HK AX2810Q-750's
- Now run 10x5 Graupner e-Props (Xoars on the way)

|
| New brushless gimbal and control board |
| And of course, I couldn't leave the gimbal alone so I stripped more weight! |

|
| Couple small peices CF and Aluminum and some drilling and tapping. |
| I used very little damping and mounted the system around the CG |

|
| Bottom view of Gimbal Mounting |
| Gimbal mount from the side |

|
| You can see the minimal damping |
Another Gimbal Update!
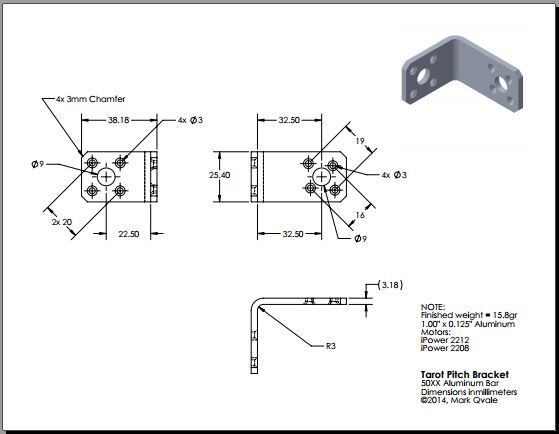
This quad has been a rock solid performer! Because I can't leave anything alone I decided to make some more improvements to my gimbal. I found a seller, Bangood.com, who offers the Tarot GoPro3 holder as a stand-alone piece for $15 so I bought a couple thinking I would build a new set-up for my wing. When I saw the holder which has amazing quality, I decided to first try it on the Disco. I had to make a new pitch bracket out of 1" x 0.125" aluminum and I had to change the IMU orientation but the rest just went together. It is much more solid and performs quite well. The only bit left to do is to add a protective lens cover.
 
|
| New bracket |
 
|
| New Tarot holder and all mounted up |

|
| Ready to fly! |

|
| And now with 37mm lens protection |
| Gimbal weight without camera or control board | |
| Part/Component | Weight |
| Printed base w/standoffs and screws | 30.0gr |
| iPower 2212 Roll Motor | 46.2gr |
| New Pitch Bracket w/screws | 15.8gr |
| iPower Pitch Motor | 40.0gr |
| Tarot GoPro3 Camera Holder | 22.0gr |
| Total Gimbal Weight | 153.8gr |
The following drawing and associated dimensions are specific to using a GoPro3 with it's battery installed and iPower 2208 & 2212 brushless gimbal motors.
|
| Click on image to see or save a PDF copy |
A Video Sample
|
Near Haller Pass, Washington - July 2014 |
See Also
Vendors used for this Project
Comments? Questions?