Valley View RC 50cc Slick 540
![]()
December 2011

- It all started at the Wenatchee Huckfest, I just got all a-tingle...
- Then there was SupaTim and the NCC, flyin impossibly low, slow and close...
- Then that damn D-man and the Starbucks Smokin' Slick 540...
- I just had to, couldn't help myself, an intense kind of need really...
- So, with that, this is a build log of my Valley View Slick 540
Don't hesitate to make snide remarks (yes, there is lots of red and blue loctite cause loctite has always been my friend!), questionable comments or point out where I may have under or overbuilt anything.
Enjoy - Mark
Contents
General Specifications
Distributor - Valley View RC
Aircraft - 50cc Slick 540
Build Date - December, 2011
| Airframe Type - | Mid Wing 3D | Flying Type - | Super 3D | |
| Wingspan = | 88 inches | Length = | 87 inches | |
| Wing Area = | 1426 sq. inches | All-Up Weight = | 16 Lbs. | |
| Engine - | DLE55 Gasoline 2 Stroke | Wing Load = | 25.8 oz/sq. ft. | |
| Propeller - | 22 x 8 Xoar | Power = | 5.5 Hp | |
| Thrust = | 30+ Lbs | Thrust/Weight = | 1.9+ | |
| Battery Type - | A123 6.6v | Capacity = | 2600 mah | |
| Smoke System - | TME | IGN - | DLE/Mpi |
Build Review

I won't go into un-packing or pictures of boxes, we've all been there. I will say it was pretty cool picking up a box that required the tailgate to be down to fit it into the bed of my truck!
First up - Parts list (cookie recipe)
You gotta get lottsa stuff for a project like this, with a little help from my friends this is what I put together:
First I picked up all this directly from Valley View RC. I can't say enough about their hospitality and their great help in selecting all the bits and pieces.
| 50cc Slick 540 Green | DLE-55cc Engine |
| Xoar 22x8 Prop | RCEXL Opto Gas Kill Switch |
| MPI Volt Regulator | A123 2300mah Batt |
| Miracle Red Fuel Dot | Miracle Black Fuel Dot |
| Walbro in-tank Fuel Filt | Miracle Fuel T (x2) |
| VV 50cc Servo Extension Kit | RCEXL Tachometer |
| Gas Container w/hand pump | Tygon Tubing 3/32 - 6' |
If that wasn't enough, next, online shop-o-rama! (sources)
Lipo 1000mah 2S Battery (HK)
Aluminum Servo Arms, Long (2x) (HK)
Straight Fuel Outlets (2x) (Central Hobbies)
90° Fuel Outlet w/Flange (2x) (Central Hobbies)
3.5” Dave Brown Vortech Spinner (Central Hobbies)
Hitec HS-7954SH (5x) (ebay-powerhobby)
Hitec HS-5495BH (ebay-powerhobby)
Sullivan hi-temp smoke tubing (Tower)
Dubro Foam LXE100 (Tower)
Prop Drill Guide DLE-55 (Tower)
Bison Pitts Muffler (Tower)
Spektrum AR9100 RX (ebay-powerhobby)
Hobby Pak Wing Bags (Hobby Pak)
Servo Hub AW60-102-01 (2x) (Air Wild)
Fail Safe Pin Switch (Air Wild)
TME Smoke Pump with check valve (TME)
Lots of fasteners cause I'm picky and I like them shiny and stainless! (Microfasteners.com)
Cookie Dough

Control Surfaces
Elevator
The elevator, rudder and aileron hinges which came with the kit did not seem very robust so I instead elected to use Robart Hinges of the same size on all control surfaces. I used Gorrilla Glue and protected the hingey parts with Syl-Glide silicone grease (amazing stuff! Napa Auto).
The servo mounts on the Horizontal Stab were all pretty straight forward stuff. Mount the servos, center them and install the aluminum arms with blue locktite on everything. I used socket head woodscrews and stainless on the arm center screw. I paid carefull attention to tying back the wires so they would never interfere with the arm movement. The servo cut-outs fit the Hitec 7954 servos perfectly.
Servo and Linkage

How about a little color? (Photoshop)

Rudder
Rudders are always a little tricky and this one was no different. The rudder servo tray was weak (underglued) and the first time I ran the servo it popped apart. I re-glued it all and added a CF stiffener. Also, the CF servo arm which came with the kit is slightly overdone so I redrilled the holes in a better geometric position to avoid cable over-stretch.
There was also an issue with the location of the Rudder control horns. If you were to glue them in the slots provided, the max down elevator travel would be restricted to 22 degrees. I re-cut a new lower slot and moved the horns down, this gives 35 degrees down travel and I will see how it flys this way.
CF rudder servo arm showing new hole locations and CF stiffener

Rudder control horn showing original and new slot positions

Rudder/Elevator interference

Wings
Again, all the normal stuff. Hit the area around the servo holes with a trim iron, cut out the covering and install the servos. Center and add arms. I used "Air-Wild" aluminum servo hubs on the Ailerons along with the kit supplied CF arms. In my case I drilled the hubs for a 2.5mm socket head cap screw.
Aileron servo detail

Fuselage
This is an Engine!
Engine set up is pretty straight forward. The drill patern on the firewall matched the DLE55 mount exactly. I had to relieve the inside so washers would lie flat and then I went over all the engine box seams with thirty minute epoxy.


Using a piece of music wire I determined where the holes needed for the fuel line and throttle arm should be drilled. After all holes were drilled, I wicked in thin CA. Next I built the servo mount inside the box using the supplied wood piece and some ply and bass wood. I positioned the servo so that the actuation was a straight shot without any bends.
Servo Mount

Linkage detail

I am using the Hitec HS-5495BH high voltage digital servo for the throttle. I made an offset control arm for the carburetor so the servo actuation would be 1:1 using the Hitec aluminum arm. I used 2-56 ball links at both ends.
Servo mounted

I chose a Dave Brown Vortech Spinner which required some special machining to fit it to the DLE and then a little work with the dremmel tool.
Dremmel work

Spinner fit-up

Last bit of work for the engine is the cowl cut-out. I used a dremmel with a cut-off wheel for the rough out then a 1/2" sanding tube to clean up the edges.
Bottom view

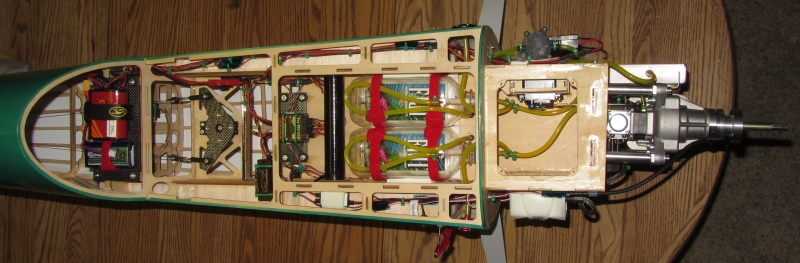
Battery/Rx Tray
I made the battery tray out of 1.5mm CF sheet. I had picked this up from Hobby King some time ago to make some rubber isolated motor mounts (different project). Plywood would have worked just fine but the CF looks cool! I glued in two mount rails and used sleeved rubber vibration isolators on the four corners. Cutting the CF is very easy with a dremel cut-off wheel just don't forget the dust mask!
The bare plate

The A123 is the RX pack, the blue lipo is for SMOKE!

RX Tray
The RX tray was also made from the CF sheet and mounted on rubber isolators. Here too I first glued in a plywood mount rail for rear support.

Fuel & Oil Tanks
The Gas and Smoke oil tanks were made from Fiji Water bottles (500ml). Here is a link to a "How-To" on this. Each one took about twenty minutes to assemble and cost about $6. I did have to cut new strap holes as the airframe kit assumes a single tank. They both sit on top of a Dubro foam blanket. The gas side has a felt klunk and the oil side an open klunk.
Link: http://www.teamflyingcircus.com/forum/f52/water-bottle-gas-tanks-4477/index4.html
Fiji!

Ignition system
The ignition system has three parts; the ignition box, an electronic kill switch and a voltage regulator. The kill switch needed a little modification so that it is set up to get power through the RX and I added a longer RX lead to eliminate one connection point. The regulator has a large heat sink so I mounted it inside the cowl where there is lots of fresh air for cooling. All three components are mounted with Dubro foam for vibration isolation.
Wrapped in foam and tied to the right side engine box

Smoke System
For a smoke system I went low cost. I bought a TME bare smoke pump and check valve for around $40 and I am running the whole thing through an old Castle Pixie 20 amp brushed speed control plugged into the gear channel.
Smoke system components (needs Hi-temp hose to the muffler)

Latches
I am not a fan of screw on canopy latches. They mess up the finish, they come loose, they are not elegant. On this airframe I thought I would try the spring latch found in many ARF's today. I decided to use two for a little extra insurance and I also added back-up 3/32" ply to the area in the canopy the latch hole is drilled. The latches themselves are mounted to 1/8" ply on each side of the battery tray using #1 phillips wood screws (the only phillips head screws on the entire plane!).
Canopy latch detail

Miscellaneous
Fuel Dots - I wanted to put these as far forward as possible to be close to the fuel line T's so I had to build a mount plate on each side. Pretty straight forward, I used 3/64 and 1/16 plywood.
Gluing in the mount plate


Radio Set Up
I am using a Spektrum DX7 with an AR9100 RX. The AR9100 has dual 16ga battery leads and an external switch port which I really like. Because I am using a 7 channel set-up I do have to combine at least two servos so I am using a "Y" adapter on the elevator servos. Doing this requires reversing the rotation of one elevator servo and reprograming the endpoints but this is very easy with the Hitec units I have chosen. Here then are my set up specs:
| Hi | Lo | |||
| Control | Dn | Up | Exp/Rate | Exp/Rate |
| Aileron | 45 | 45 | 65/100 | 35/50 |
| Elevator | 35 | 45 | 65/100 | 35/50 |
| Rudder | 40 | 40 | 50/100 | 30/70 |
These will change after getting some flight time in, this is just the starting point.
Graphics
Because the D-man did the amazing Starbucks theme on his slick, I had to do something different and a bit more subtle. I tossed around a couple of ideas to add a little color and this picture was photo-shopped to get an idea how it might look in flight (with FlopGun piloting of course!):

Done Yet?
Looks ready! Slap on the cowl, screw down the hatches and head for the field!
Mouse over this image for a 2x blowup :)
Maiden
It's Maiden time!
Well, almost...
Because of the temperature (and the fog) I elected not to fly this first day of Winter, 2011. I did run a half tank of gas through the engine and got her well tuned and ready for the next attemp which hopefully is not too far off.

The Wait is Over
(Basically the following day)
Jeez this thing is awesome and it makes the most perfect noises!
The first flight (in the video) was about 5 minutes and I pretty much kept it just in circles checking uplines, downlines, some inverted and hands off at idle. This baby needed exactly two clicks up elevator and one click right aileron. That's it!
The second flight I wrung it out a little more with a couple tumbles including a double, an extended inverted flat spin and a few high (3 mistakes up!) R-L knife edge passes. All were solid and rock steady. The landing this round I didn't really touch the sticks at all, I simply came in low and slow and cut the throttle and she settled down perfectly. In a word, beautiful! This flight lasted a timed 9 minutes and came down with about a half tank.
I can't wait to get a real full day of flights in...
Mark
See Also
Comments? Questions?