Hanger 9 Funtana 125
![]()
November 2010

| Bigger definately flys better! |
Contents
General Specifications
Build Date - November 2010
| Airframe Type - | Mid Wing 3D | Flying Type - | Massive 3D | |
| Wingspan = | 69.5 inches | Length = | 68.5 inches | |
| Wing Area = | 1108 sq. inches | All-Up Weight = | 159 ounces | |
| Motor - | Scorpion 4035-330 | Wing Load = | 20.7 oz/sq. ft. | |
| Propellor - | 18 x 8 Turnigy LE | Power = | 2400+ watts | |
| Thrust = | 370+ ounces | Thrust/Weight = | 2.33 | |
| Battery Type - | Lipoly 8s1p | Capacity = | 4000 mah | |
| Speed Control - | CC ICE 100 amp | BEC - | CC 10 amp Switching |
Commentary
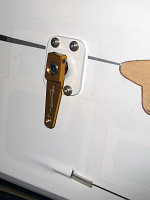
This is the first "Used" plane I have acquired but I couldn't pass it up. It was too good of a price and the previous owner, whom I fly with, takes very good care of his equipment. Considering the huge number of flights he had on it, D-man kept it in wonderful shape.
The plane came with a Scorpion motor, Hitech analog servos and linkage. D-mans Mods were minimal with an air passage built into the standard motor mount for battery cooling, a nicely done pull-pull rudder set-up and a re-built, stronger landing gear. The elevator servos, (2x) Hitech 225MG's mounted in the tail, were smaller and lighter than the recommended units but they made more than enough torque for the job at hand and helped significantly with the "heavy tail" issue this plane came designed with.
Because I was excited about having a new plane, I first put it together quickly and pretty much the same as D-man so I could fly as soon as possible. I made almost no changes other than adding an SBEC and receiver battery with a disarm switch.
The fist issue I ran into on my first set-up was figuring out a programmable method of dealing with both dual aileron and dual elevator servos on a Spektrum DX6i rig. I did the ailerons as a normal dual servo set-up using the aux port and then found a smart solution on RC Groups by someone who had worked it all out. It worked fine but had some limitations in full travel.
A second issue was the CG. I am using the same battery packs as D-man but even with the lighter servos in the tail, the plane was too tail heavy. I ended up adding 2.5 ounces of nose weight as D-man did and was still on the ragged edge of the CG range.
The following notes then are my minor re-config changes to accommodate my preferences in equipment and set-up.
Happy Flying! - Mark
Re-Configure Changes
1. Elevator hinges
2. Elevator servos and linkage
3. Cooling exit
Elevator Hinges
On the last flight (my 12th) I noticed the elevator hinges were coming apart. Not surprising given the age. I picked 1/8" Robart pin hinges and used four on each side. I really like these as they are very smooth and easy to install when glued hinges have already been in place. I will do the rudder and ailerons in the future.
Elevator servos and linkage (SEE "Servo Update!" AT END OF THIS SECTION)
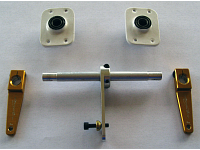
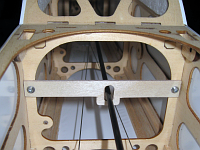
I don't like adding ballast weight anywhere on an aircraft because there is something wrong with a particular design. In this case I decided to manufacture a custom bell-crank assembly to replace the rear elevator servos and change to a more powerful servo located near the CG. I figured if I could pull an ounce or more out of the tail and keep the net weight the same or less this would be enough to remove the 2.5oz ballast weight and move the battery back about an inch to give me some good adjustability on the CG.
So I went to work designing and sourcing some parts for this mechanism, here is what I used on the bell-crank construction:
- 1/4-OD x 1/8"-ID 6061T6 aluminum tubing (LHS)
- 10mm x 3mm x 6mm Sealed ball bearings (Trax)
- 1/8" Plywood for bearing retainer plates (LHS)
- 10mm-ID x 12mm-OD CF tube for the bearing mounts (HobbyCity)
- 9mm-ID x 10mm-OD CF tube for the bearing stops (HobbyCity)
- JR Aluminum servo arm (JR)
- Hitech Aluminum servo arm (HobbyCity)
- Dubro 4-40 Sherical Ball ends and Dubro locking pin clevis
- .127" x .088" Carbon Fiber tube pushrod
- 4-40 all thread
- 1/4-OD x 1/8"-ID 6061T6 aluminum tubing (LHS)
Here are a few pictures of this assembly (mouse over for enlargement):
|
|
|
|
|
|
|
The net result was an overall weight reduction of the complete elevator servo set-up of .4 ounces. The weight at the servo location was reduced from 2.75 ounces to 1.34 ounces or -1.41 ounces! This is significant in terms of rotational inertia and the placement of the battery which is now moved rearward 1.75". This creates more than enough space to move the battery forward or rearward for any realistic CG location without needing any additional ballast weight.
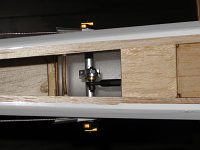
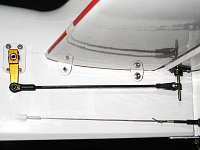
For the elevator servo, I went with a Bluebird BMS-616DMG+HS Digital unit. It makes more than twice the torque of the Hitech 225's it is replacing and has above average speed (0.12 sec/60°). I fabricated two 90 degree servo mounts out of 1/16" aluminum angle and mounted the whole assembly just behind the wing tube.
Elevator Servo pictures:


Servo Update!
I have swapped out the Hitech 645MG servos for a new Spektrum digital unit on elevator and ailerons. Additionally I moved the Bluebird unit to work the Rudder. These new Spektrum digitals are amazing!
At 6.0v
- Model - Spektrum SPMSS6040
- Torque = 167oz-in
- Speed = .08s at 60 degrees (scary!)
- Coreless motor design
- Titanium Gears & Dual Ball Bearing

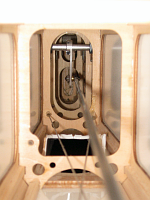
Cooling Exit
The cooling exit set up when I got the plane was a large ~4" cutout in the bottom of the fuselage just rear of the wing tube. This worked OK but it looked odd in flight (to me) and I suspected this vent was affecting some 3D maneuvers.
My solution was to create a more active vent utilizing an air scavenging type opening farther to the rear. If built well, this type of vent duct can pull (move) a lot of air without being too large and additionally shouldn't affect any 3D flying that utilizes the bottom surface of the airframe. The following pictures show this simple build before and after covering


Equipment Choices
- Servos
- Rudder - (1) Blue Bird BMS-616DMG+HS
- Elevator - (1) Spektrum SPMSS6040
- Note: Blue Bird servos are notorious for being current hogs! You must have a minimum 5 amp servo supply to avoid receiver issues.
- Aileron - (2) Spektrum SPMSS6040
- Flaps - None
- Battery Pack (Flight) - Zippy 8S1P in a 4S2S configuration, 30C, 4000mah, 31.4oz
- Castle Creations ICE 100A ESC, 2.8oz
- Battery Pack (Receiver & Servos) - Nanotech 3S1P, 20C, 1000mah
- Voltage Regulator - Castle Creations 6v Switching SBEC
- Flight time - 9 - 11 minutes

Battery Box with CC BEC
Motor & Prop
- Motor - Scorpion 4035-330
- Prop - Turnigy Light Electric Wood 18x8
Another change I made was to replace the stock motor mount, made from plywood, with my own bits and pieces. There is nothing wrong with the stock plywood box mount, it was just too long with the Scorpion motor and I didn't like the look of the prop spinner nearly an inch forward of the cowl. Here is a picture:

Motor Mount and CC ICE100 ESC
Radio
- Spektrum DX7i TX
- Spektrum AR6200 RX
At the end of my reconfiguration the all-up-weight of the plane cames to 9Lbs, 15.9oz which is about 24oz heavier than the weight given by Hanger 9. Given the fact my components are lighter in every respect than the factory recommendation; I suspect their published fly ready weight specification is based only on the wet fuel set-up.
Flights & Updates
- Note: After finishing the work on the bellcrank assembly I literally stumbled on an almost identical part from Hobby City:

Link to supplier
There are three width sizes avalable and all three are adjustable (by trimming) as well. The arms are a bit short but it would be very easy to add on some larger CF arms. The entire assembly rides on ball bearings and seems well built and very smooth. The weight of this purchased assembly is 0.5oz (14gr) which is a bit lighter than my build up which is 1.34oz (38gr) but it will be close with longer arms.
My Maiden
OH
MY
GAWD!
In this hobby you often here the term "bigger flys better". Well, this plane is big and it flys amazing. With the power set-up installed, take off is immediate and immediately vertical. The plane tracks solid straight up and inverted and has no signs of "twitchiness" or unexpected movement.
Landing
This is the only area that has been a little tricky. I believe this is mostly because every flight so far has been with the CG set behind the recommended range becuase of the tail heavy design. Now that the new cofiguration is done I am waiting for the weather to cooperate and then I will have an update!
Final
I love it. It is an awesome flying experience. And I will now be another promoter of the idea that bigger flys definately better. - Mark