Easy Brushless Gimbal
![]()
August, 2013

| |
| CAD Concept (Mouse over for exploded view) |
TBS Discovery Gimbal Part 2
After buying and trying a few of the offerings in the camera gimbal world I decided to make my own. The issue I had with the purchased units was their size and weight, some even weighing close to 16oz (450gr). And this was to carry a GoPro! The other issue I found was they are all designed to hang from the bottom and what this does is create an enormous wind profile which can be a handful to fly in. So, I decided on a front mount to limit the wind profile and to use the lightest and smallest components I could easily make to limit the weight.
So far, Success! The set up I have on my TBS Disco adds almost zero additional frontal area and well under 2 square inches side area. The weight add, with the small iPower motors is 6.2oz (176gr). The Gimbal build shown here is a little heavier at ~6.9oz (196gr) because of the larger RCTimer motors but this is still well under what you can buy today. The weights shown include the control board, IMU board and wires without the camera.
Mounting
The mount you see here I originally developed for my TBS Disco. It has worked very well on that machine so I decided to use it again on a new Hoverthings build I am doing. It utilizes very minimal vibration damping so it is imperative you remove all vibration you can by carefully balancing the props and motors.
All the pieces were made or purchased from a local hardware store with the exception of the stand-offs. The stand-offs are leftover from the TBS Disco kit but similar ones can be purchased from online stores like McMaster Carr. These are aluminum and are tapped for 3mm screws on each end. I did have to cut them down to 1-1/4" in length to fit the Hoverthings frame. The main mount tube is made simply from a piece of square aluminum tube sized: 1" square x 1/16" wall thickness. The grommets are standard black rubber and they fit a 5/16" hole. These were listed as: 3/16"ID x 5/16"OD x 1/16"TH. The nylon spacers are 3/16"ID x 3/8"OB x .080TH.

|
| Mount pieces |
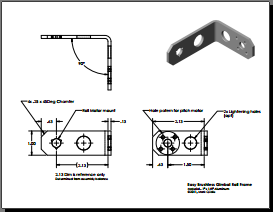
Pitch & Roll Frames
Both swing brackets are made from aluminum flat bar 1"W x 1/8"TH. Like the tube mount I drilled out significant holes for lightening (every gram counts!). The Pitch (camera) bracket needs to be long enough to accommodate my GoPro2 with the video out plug installed so it ended up at 3" (76mm). The depth of the camera bracket for this camera is 1" (25mm) from the pitch motor center to the base. In every case though, you need to check and adjust this distance so that no matter what position the camera is in it stays in that position balanced. Cut bend and drill this bracket first.
The Roll bracket is built using the same material and is 1-1/2" (38mm) deep. Cut bend and rill all but the roll motor mount holes, save them for last. The length of the bracket and subsequent position of the Roll motor mount hole is determined by assembling the camera, camera straps, pitch bracket, pitch motor, IMU and wires and then finding the balance point on the roll bracket. This will remove the need to make the mount holes slotted or the addition of balance weights.

|
| Assembled for balancing - Hardware and wires not shown |
Bits & Pieces
Because I already had a set of extra motors and an extra Martinez brushless controller board, I thought it would be great to add this to my new Hoverthings Parts Bin Quad project.
Parts List:
- 1ea Mount - Sqaure aluminum tubing, 1"sq (25mm) x 2"L (50mm) x 1/16"wall (1.5mm)
- 1ea Pitch bracket - Aluminum flatbar, 1" x 1/8" (3mm) x 4-1/2" (112mm)
- 1ea Roll bracket - Aluminum flatbar, 1" x 1/8" (3mm) x 4-1/4" (106mm)
- 12ea Socket Cap screw - 3mm x 6mm SS
- 8ea Socket Cap screw - 1.5mm x 6mm SS
- 2ea Nylon spacers - 9mm x 5mm x 2mm
- 2ea Aluminum Standoffs - 5mm x 31.7mm
- 4ea Rubber Grometts - 5/15" x 3/16" x 1/16"
- 2ea RCTimer 2212/80 Brushless Gimbal motors
- 1ea RCTimer Martinez V1.0 control board
Weights:
- Gimbal hardware including motors - 6oz (171gr)
- Control boards and wire - 0.85oz (24gr)
- Total gimbal weight - 6.85oz (195gr)
Drawings
Here are two simple drawings of the Pitch and Roll frames. The dimensions shown are designed to accommodate a GoPro2 or GoPr3 camera:
|
| Click on either image to see or save a PDF copy |

|
| The actual hardware I put together for the Hoverthings build |

|
| Partially assembled components |
My Two Examples
On the TBS Disco

|
| TBS Disco with front mounted set-up (Roll Frame made from 1/16" aluminum on this one) |
On my new Hoverthings Parts Bin Quad:

|
| Ready to Fly with my Easy Gimbal |
Modifications - 3D Print Base
I was given a link to some inexpensive rubber dampers from nakelp86 on RC Groups and they were the inspiration for a new mount idea. It's a little heavier than the aluminum tube but it does a much better job of damping the high frequency vibration. This mount is made from a piece of 1.5mm CF plate (HobbyKing) with the new two piece dampers screwed on. I also added some silicone fuel tubing to the stand-offs to size them correctly for the new dampers which have an 8mm hole.

|
| New Gimbal mount |

|
| Mounted on the TBS Disco |
Next I was contacted by Lioon on RC Groups about his 3D printed gimbal. I suggested he add some damping to improve his video quality and after some back and forth using his idea as a start, I came up with a 3D print version of the new mount (above). The first copy of this version has been printed in ABS at a fairly rough resolution but it fits very nicely and is the lightest one yet.
I designed it to use the same dampers as in the bolt on units above. Now I just need a source for the rubber bits.

|
| SolidWorks image of the new 3D printed mount |

|
| Printed and ready to mount |

|
| Mounted on the TBS Disco |

|
| Now with a stronger pitch arm and Tarot GoPro holder! |
Video Sample
Here is one of my first videos (TBS Disco):
|
Enjoy! |
Here is a video testing my new 3D printed mount.
|
It works! |
See Also
Comments? Questions?